Wood Burning Art – A Guide on How to Wood Burn
The term “pyrography” stems from the Greek words pur (fire) and graphos (writing), and can therefore be translated to mean “writing with fire”. This is exactly what pyrography entails, as wood burning art has been in existence since the discovery of fire. Today, people around the world are creating their own pieces of wood burning art from their own homes. We have prepared a detailed guide on how to wood burn, so that you too can partake in the revival of this unique art form!
What is Wood Burning Art?
The art of wood burning involves taking certain materials such as wood, leather, and even cork and using a hot metal tip to burn the surface. The process of burning will cause the affected surfaces of the material to turn a darker shade, allowing you to create all sorts of pyrography designs upon the surface.
The first instances of wood burning art took place in parts of ancient Africa, especially in Egypt. The people of this time would simply take a piece of metal and heat it up in a fire, after which they would decorate their wooden or leather pieces.
Wood burning art was originally referred to as “pokerwork” until the invention of pyrography machines towards the end of the 19th century. Before this time, the term “pyrography” had not yet been coined. It was the invention of electricity that allowed for the development of this art form, as specialized pyrography tools such as the soldering or branding iron have since been created.
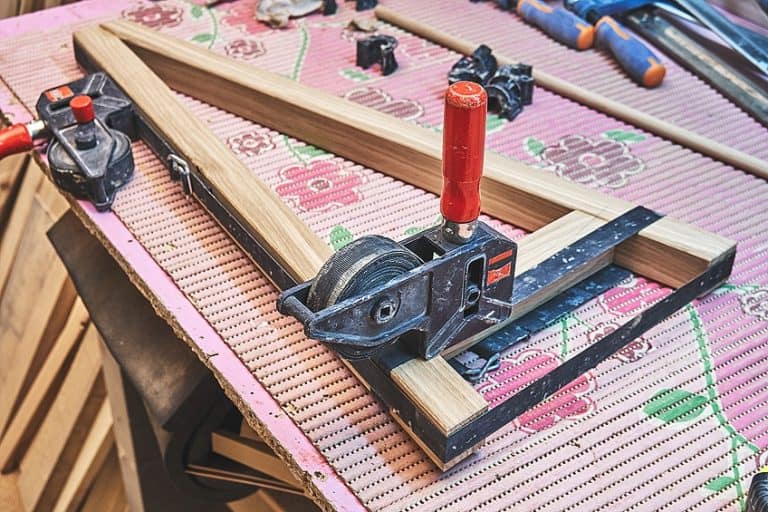
Now, anyone can learn how to wood burn as long as they have the correct tools. There is a wide selection of wood burning tools available on the market, each of which offers different things. These tools have been optimized so as to allow for the regulation of temperature and metal burning loops that can be swapped out to achieve different results.
Pyrography Art Tools and Materials
It is not difficult to learn how to use a wood burning tool, although the equipment may appear intimidating at first. You can begin wood burning with as little as a pyrography pen and some metal burning loops. You can find the tools you will need in most wood burning sets.

Pyrography Pen
Soldering irons were used in the past to create fairly simple designs, as the potential for fine detail was quite limited. We suggest that you purchase a specialized pyrography pen instead, as this tool can achieve much more than a simple smoldering iron.
The primary difference between a pyrography pen and a smoldering iron is that the former is able to reach significantly hotter working temperatures, making them more versatile.
The tip of a pyrography pen can include either a burning loop or a shaped tip, which can be replaced with ease according to the needs of your design. Thus, your designs will have unlimited potential with regards to its texture, shading, and effects.
If you select a wood burning pen of a high quality, you should be able to adjust your firing temperature according to the nature of the material you are burning. You can regulate the temperature by attaching a rotary wheel onto the pen, which is the principle behind the pyrography pen. Most wood burning kits, on the other hand, come with a special transformer that will help to regulate the temperature.
Holding Bracket
You will find that getting a special holder for your pyrography pen can be quite helpful. These holders are fire-resistant, allowing you to place your pen down safely without the risk of damaging a nearby surface.
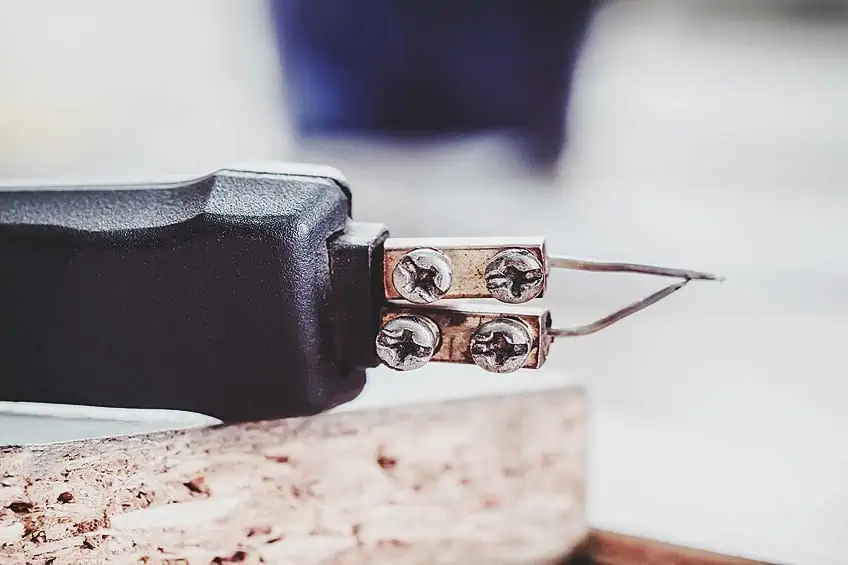
Burning Loops
You can choose between using a burning loop or a shaped tip for your pyrography pen. Burning loops are a piece of solid wire that has been shaped, whereas shaped tips are solid metal heads of particular shapes. You can switch between either while working on your wooden piece.
You can achieve a range of unique burning effects by having a set of different burning loops and shaped tips on hand and within reach. You can choose between tips that are pointed and thin and loops that are rounded, curved, and wide.
Other Necessary Pyrography Tools and Materials
You will also require a screwdriver and wire brush for your wood burning purposes. You can use the screwdriver to change your pyrography pen tips and the wire for cleaning the various loops and tips. An orbital sander and sanding paper of various grains will help with the processing of your wooden piece, both before and after burning.
You may also need a sanding machine if you are planning on wood burning a large wooden surface. Once finished, you should protect the burnt wood by applying an oil (natural wood or linseed oil is best), varnish, and wax. This will protect your wooden piece from retaining moisture, which can result in mold and mildew.
As you become more experienced, you may find that you will need additional wood burning tools to aid your work. Gas burners are useful for burning larger areas. You can also get a multifunctional tool that has various attachments, particularly for grinding and milling, as this will allow you to achieve fine details within your design.
Sketching Tools
You will need to draw a light sketch of your design over the wooden surface to guide you when burning.
- You will need a pencil, eraser, ruler, and compass to imprint your own free-hand sketch onto the wood.
- You can use carbon paper to trace a printed template onto your wood.
- Pre-made stencils are especially useful.
What are Famous Wood Burner Brands
When starting with wood burning, you will notice that there are quite a few brands to choose from. As with every trend, more products and brands will appear as it becomes more popular. Therefore, a little research is good before you buy your wood burning tool. Look out for popular brands that offer better quality. Below are only a few of the best brands available, there are many more you can choose from. Some of the most well-known brands include:
- BRENN PETER: This German brand is the first choice for many wood-burning artists. However, they can be difficult to purchase if you are not in Germany. Fortunately, there are a few other excellent brands available in the USA.
- TOPELEK: Another great brand, which offers superior quality and has many positive reviews from users. This pyrography kit can easily be used by the beginner artist but is just as good for the more advanced user.
- VIIART: This brand is also a good choice for those who want more out of their pyrography kit, and is also excellent for the professional user.
- WOODLAND HOME: A well-liked option that is excellent for the beginner pyrography artist, which comes at an affordable price.
A Guide on How to Wood Burn
If you are new to wood burning art, you will need to know the basics of this technique so that you can create your own pyrography pieces.
Safety Precautions
There are a number of risks with regards to health and safety when working with wood burning tools. Pyrography pens can reach temperatures as high as 1832 degrees Fahrenheit, which would cause a lot of harm should any accidental burns take place.
The nature of this technique means that a lot of smoke is produced as a result, meaning that there is a chance of you inhaling the carbon in this smoke. Additional toxic fumes can be produced if there are any resins, fungi, or other chemicals in the wood you are burning.
Thus, you ought to take the following protective measures and safety precautions when wood burning:
- Ensure that your work space is well-ventilated.
- Always wear a respiratory mask and goggles. For bigger, longer works, you can also use an extractor fan.
- Ensure that you are working on a base that is resistant to fire and heat.
- Find a suitable, fireproof means of storing your wood burning tools.
- The material that you want to burn should be completely clean, untreated, and adhesive-free.
- Never leave your active wood burning pen unattended. Always make sure that you switch it off and place it in its respective holder before leaving the room.
- Never touch the burning loop while the pen is switched on. Wait for the loop to cool down completely before trying to change or clean it.
- Pay close attention to the manufacturer’s suggestions for the materials you can burn. You should never burn any plastic or synthetic materials, as this will produce toxic fumes as a result.
- Try to sit comfortably when wood burning to avoid hurting your back.
- Never allow children to work with a wood burning tool without supervision.
Choosing Your Wood Burn Art Tool
It is certainly worth splurging on a good product when it comes to your pyrography pen, as this is the tool with which you can use all sorts of differently-shaped tips and loops. You should choose a pen that can accommodate a wide variety of burning tips and tools.
You can exchange your wood burning pen’s tips as is required, where you can choose between burning loops and shaped tips. Classical wood burning involves the use of burning loops of different shapes and sizes to achieve various effects:
- Thin and pointed: These flame-cut loops can be used for outlines and finer details.
- Bent: This shape enables you to incorporate gentle transitions and can be used for burning larger areas.
- Flattened and round: This is a great all-round shape that can be used for fine lines and on denser surfaces.
- Flattened with a wide focal point: This shape is ideal for detailed, fine lines and for shading.
With regards to pyrography pen shaped tips, you can usually purchase these as a set. These tips are a great modern alternative to burning loops, and also allow for different effects depending on their shape:
- Round tips: These tips are ideal for general burning and are a great all-rounder.
- Flat tips: These shaped tips are best used for shading.
- Pointed tips: These tips allow for detail and are ideal for drawing contours and fine lines.
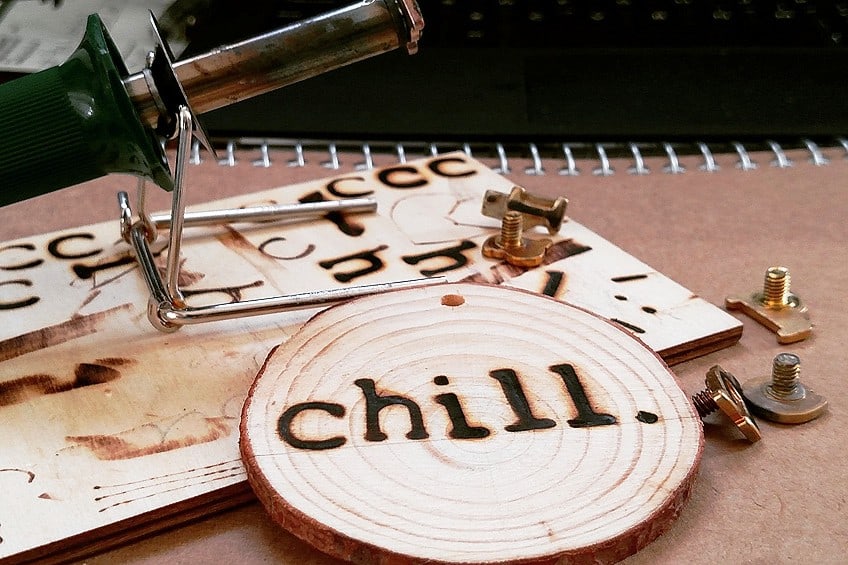
You can also get sample stamps for your wood burning project, which allows you to burn a small design onto a piece of wood as practice. Other manufacturers offer burning tips in the shape of letters so as to allow for the easy burning of names and quotes.
Different Types of Wood to Use with Your Pyrography Kit
Wood that is softer, light in color, and has less grain is great for use in wood burning. Shading and details will stand out more on the light wood. When making darker burn details, it will also show up more prominently. Softer wood also requires less heat to work on.
The three best kinds of softwood to work on include:
- Beechwood
- Poplar wood
- Lime wood
Technically, you can also work on hardwood with a pronounced grain, but you will need to work with higher temperatures than many of the pyrography pens can reach. You also need to practice on this type of wood, as you will need to burn more into the wood to reach the desired results. This could be a problem, as you could easily apply a burn that goes too deep into the wood.
Remember always to sand the wood surface before you begin working. This makes the surface smoother, allowing the pen tips too move more easily over the surface without getting stuck. If you do not prepare the surface, it could create dark holes, breaks, or jagged lines.
Other Suitable Surfaces for a Pyrography Pen
Wood is the obvious choice for pyrography, but it is also possible to use a wood burning tool on other surfaces. However, this requires more experience. Some of the materials you can use include:
- Cork
- Leather
- Horn
- Canvas
- Paper
Those skilled in pyrography can create the most amazing art pieces on these types of materials. You will need to adjust the temperature according to the type of material you are using so as to work properly. If, for example, you use a too high a temperature, this could lead to holes or burns in the material, which cannot be fixed.
So, if you are going to work with different kinds of material, it is best to begin at the lowest possible heat setting. You can then work slowly up in temperature until you reach the result you want to achieve.
Practice Makes Perfect
Before you can begin creating your own wood burn art, we recommend that you practice on a cheap piece of plywood. This will help you to experiment with all the different pieces that you have, thus allowing you to determine which are the best for your particular project.
Once you have tested all of the burning tips, you should also experiment with adjusting the temperature of the wood burning pen. You should always adjust the temperature according to the shade of the wood, keeping in mind that where lower temperatures produce brighter effects, higher temperatures make the wood darker.
You will need to reduce the temperature if you notice scorch marks or a lot of smoke being produced, whereas you will need to increase the heat if hardly any burn marks are being left behind. This is why it is so important for you to practice on a piece of wood first before you attempt your main project.
Although plywood may be an easy and inexpensive means of practicing your wood burning skills, you should be careful not to burn the wood too deeply. This is because plywood contains a layer of glue that is toxic when burned.
Wood Burning Tips and Tricks
We have compiled a list of useful wood burning tips to help you achieve the best results for your project.
- When burning, you need to work layer-by-layer until you have achieved the final design. You should begin with the background and all lighter areas first before you continue on to the foreground and darker sections.
- Try to avoid burning long lines, as this can be difficult. When doing this, you will often get caught in the wood, which can cause dark spots to appear. We suggest working from the top down to the bottom in small stages. You can always correct any small mistakes with some sandpaper.
- Work at the lowest effective temperature. This is because it is easier to fix lighter burns than darker ones. Keep in mind that while lighter shades can always be darkened, you cannot make a dark burn lighter.
- Always ensure that you burning hoop or tip is clean. Dirt can have a negative influence on the final result.
Instructions on How to Use a Wood Burning Tool
Wood burning tools can appear tricky to work with if you do not know what you are doing, which is why we have put together this useful guide on how to use a wood burning tool. If you are using wood burning tools for the first time, we strongly advise that you begin working on a wooden surface, as it is easiest to work with.
Controlling the Temperature of Your Wood Burning Tool
Having control over the temperature of your pyrography pen can help with different applications and effects. A cheaper wood burner pen offers no control over the temperature, as it is directly connected to the power source. Therefore, it has a set temperature you have to work with. These might be okay for beginners, as its use is extremely limited.
Your next level of pyrography pen comes with controls for the temperature. These are also connected directly to the power supply and have a temperature control mechanism. In most cases, these pyrography pens have shaped tips.
There is another type of wood burner pen that comes equipped with a transformer, which then assists with the control of the temperature. When it comes to all of pyrography tool terminology, you can refer to this piece as a wood-burning station. The pyrography pen tips are usually metal loops.
So, the only distinction between the two pyrography tools, one with a temperature mechanism and the other the wood-burning station, is the highest temperature each can achieve.
When working with a wood-burning station, you have a broader temperature limit than the wood burner pen. This means that you can do much more with the station, as it provides more temperature options.
The simple wood-burning pen that has no temperature control is the most inexpensive option, but you will only be able to do so much with it. While the wood-burning station and other pyrography pens with temperature controls are more expensive, there is not much price difference between the two.
Preparatory Measures
The first thing you need to do is to ensure that you have suitable protective clothing and gear, including a breathing mask and goggles. You may find that your piece of wood is uneven and requires sanding. You can sand the piece down to a level surface and can also shape it however you desire. You will be able to achieve more precise and detailed work on smooth wooden surfaces. Ensure that all dust and debris from sanding is removed with a cloth or even a vacuum if necessary. You will not need to sand a surface made out of plywood.
Copying Your Design
You can now copy you design onto the wood in pencil. You can do this freely by hand, or you can use a stencil or tracing template. If using a tracing template, you will need to affix it to the wooden piece by gluing or taping the corners. You can then use a piece of carbon paper or tracing paper to transfer the design onto the wood. As you are copying the design in pencil, you can use a good eraser to make any corrections to your sketch.
Burning the Outlines
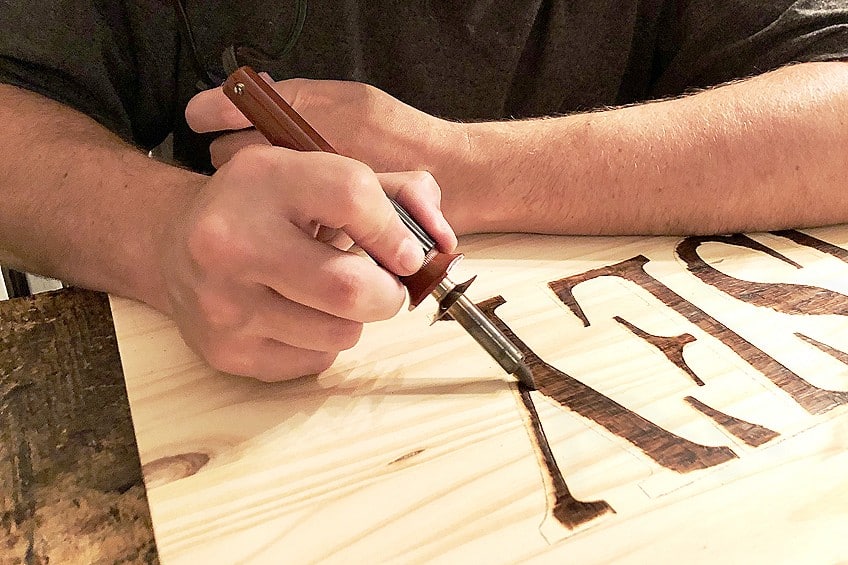
The main outlines of your design are referred to as the contours. You can set up your wood burning pen as soon as the design has been copied onto the wood. Once the pen has heated up sufficiently, you can begin outlining your design by following the contours with your pyrography pen.
Ensure you hold the pen loosely but firmly, working with as little pressure as possible. Guide the burning loop from the top of the piece down the bottom in steady movements to prevent it from getting stuck in the wood.
Be careful of holding the burning loop in one place for too long, as this can quickly cause holes. If you want to make a line appear thicker, it is best to go over it again in a separate step once the wood has cooled more.
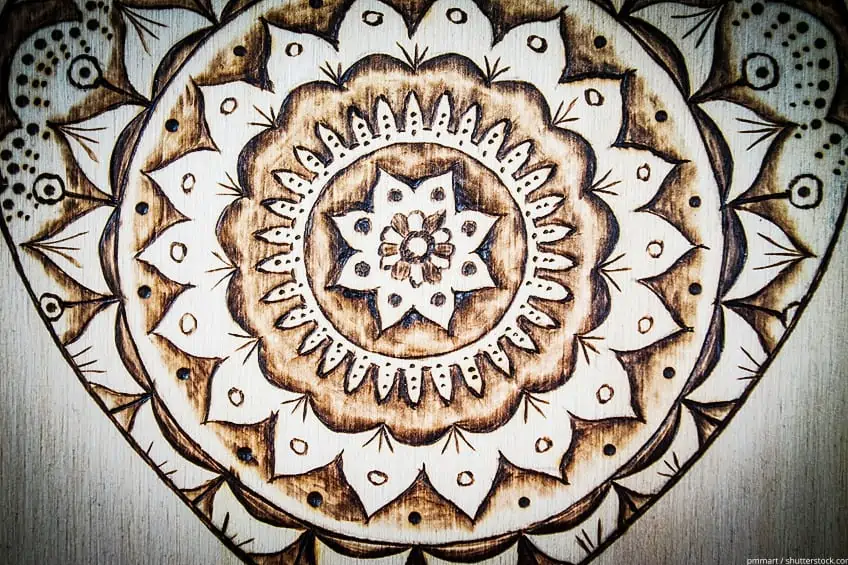
Shading and Details
Once you have completed going over the contours of your design, you can begin shading and adding in more detail. For shading, you will require a flat burning loop, and while doing so you should also hold the pen itself as flatly as possible. The process of shading can be tricky and will require a bit of practice, but if done correctly can create all sorts of incredible artworks. Use a pointed loop to fill in finer details.
Final Steps
When you have finished burning your design onto the wooden surface, you will go over the piece once again with a piece of fine sandpaper. Use a piece that is between 120- and 180-grit and go over the surface carefully.
Remove any remaining sanding dust and then enhance your piece by adding a coat of paint. You can use top-quality coloring pencils, oil crayons, or acrylic paints to do this. After adding color, you can seal the piece with wood or linseed oil, varnish, or wax. Keep your finished piece away from sunlight so as to prevent the burn marks from fading.
Some Wood Burning Ideas
There are an endless supply of wood burning ideas, each of which has the potential to produce an incredible wood burning work of art.
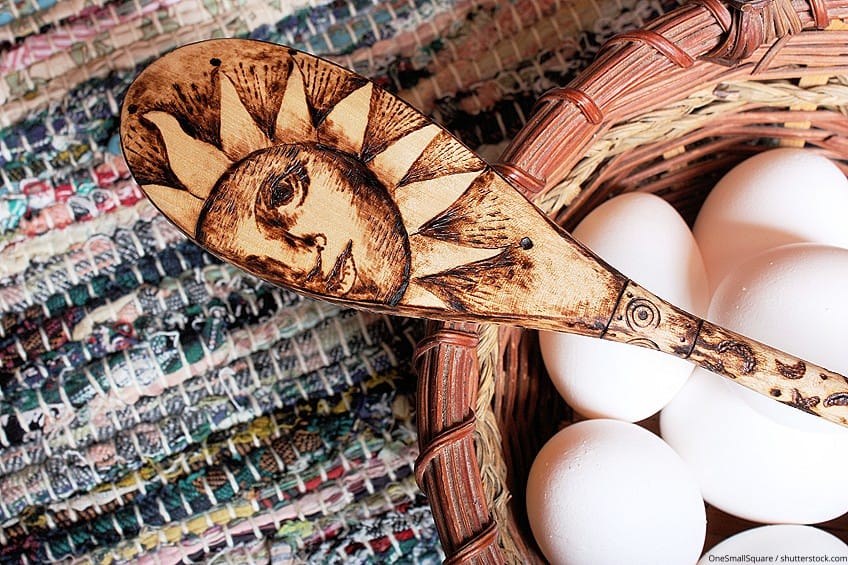
Pyrography Art on a Wooden Spoon
You can turn your basic wooden kitchen utensil into an eye-catching piece by burning a design into the surface. Sand down the surface of the wood until it is completely even and smooth, and then wipe away any remaining dust.
You can then begin sketching your design onto the wood with a pencil. You should opt for a lower temperature when working on a wooden spoon, as these items tend to be made out of a softer wood. Begin by outlining the contours of your design before adding any shading.
You can add color or paint the spoon only if it is to be used for decoration. If you plan on using the wooden spoon for its intended purpose, you can apply a final finish that is of a food-grade.
Customized Pencils
A great idea for a gift is that of a customized pencil. Ensure that you only use simple, untreated wooden pencils for this project and ensure that the surface is smooth before proceeding.
We suggest using lettering on the pencil to spell out a name or quote. You can sketch the letters yourself or you can use a stencil. Pencil wood is soft, so a temperature of 842 degrees Fahrenheit should suffice. You can also use a molded branding iron here. Add some color to your pencil at the end if you desire.
Pyrography Coasters and Cutting Boards
Pyrography is a great way to decorate wooden and cork items, such as coasters and chopping boards. You can download a variety of templates from the Internet and print them out. Cut them as close to size as possible and place them on the surface of the wood with the carbon paper underneath. You can then go over the printed lines with a pencil, which will be copied through the carbon tracing paper and onto the wooden surface.
You can then begin using your wood burning tool, ensuring that it is adjusted to a suitable temperature for the material on which you are working. Add a linseed, wood, or olive oil to the piece as a final finish.
Tip: A humorous and personalized gift for family members is to use children’s drawings as your burning template. You can copy these to the wood and give them to grandparents, uncles, and aunts as a unique present.
Burning Wooden Pegs
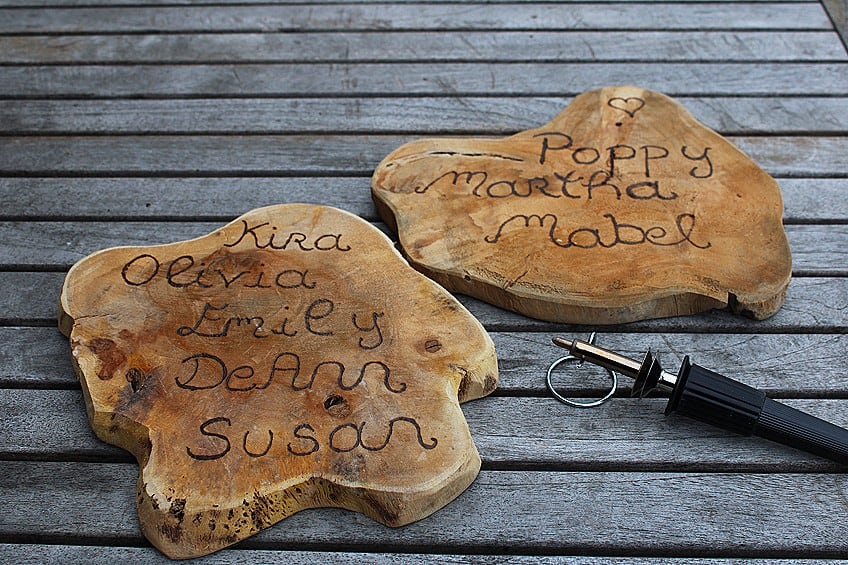
You can use the wooden pegs that would have fastened your clothing to the washing line for a number of wood burning art projects. These pegs are ideal for use as a name tag or sign. You can transfer the name or piece of writing to the clip by writing the letters in pencil or by using a lettering stencil. You can also use a branding iron stamp to create other designs and to add accessories such as decorate stones, beads, or flowers (which can also be glued on).
You can use this idea to create place cards at events or even to label your plants in bed of flowers and herbs.
Pyrography Keychains
You can use wooden pieces of various shapes to create keyrings for your home and car. Those more experienced with the art of pyrography can even use leather to create their keychains.
Other Wood Burning Ideas
There is unlimited potential when it comes to pyrography, as you can create an infinite number of designs on wood, leather, and cork so as to turn them a noteworthy piece of art. Other wood burning ideas include the following:
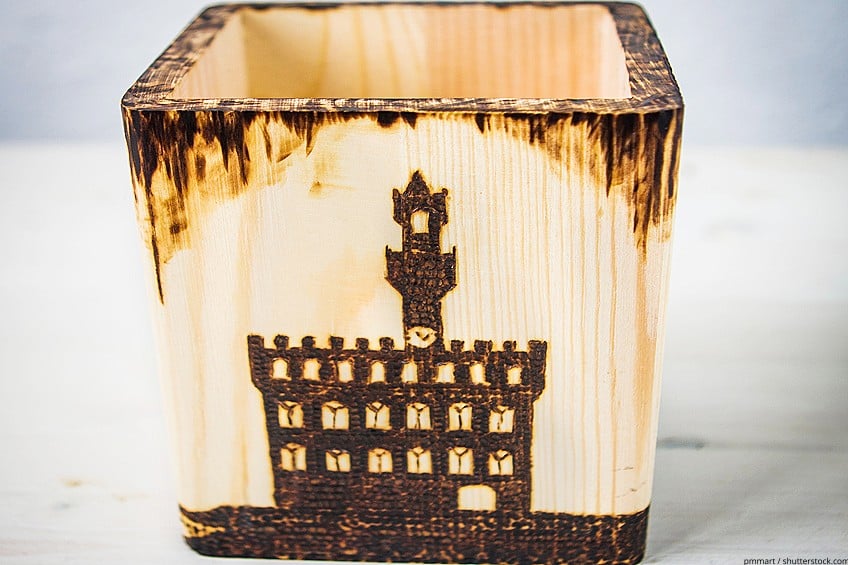
- You can decorate wooden boxes for use as gifts, for jewelry, trinkets, or to store precious items.
- You can decorate plain wooden plates and bowls with festive designs for use over the holidays.
- Decorative crockery is always a great gift. You can also use items such as bowls for storing decorative pieces such as pinecones or precious stones.
- You can decorate wooden figurines and add your own details.
- You can use a wooden board, your wood burning pen, and some paint to recreate an old favorite board game.
- You can burn designs into wooden hangers to add flair to the inside of your closet. You can also decorate the exterior of your wooden wardrobe.
- Burn designs into wooden shelving, such as those used for books and kitchen utensils.
- Personalize the back of your wooden hairbrush with a beautiful wood burning design.
- Wooden bread tins and storage containers can be burned so as to achieve classic designs that will stand out in your kitchen.
You can wood burn almost any piece of wood in your home. So begin gathering all the items you wish to decorate and have fun with creating works of art out of your everyday household items!
Frequently Asked Questions
Are Pyrography Art Mistakes Fixable?
You can fix smaller mistakes with ease by using sandpaper. Simply take an 80- to 100-grit piece and go over the affected area lightly, taking care not to sand away too much of the wood.
What is the Best Temperature for Wood Burning Art?
You will need to experiment with your pyrography pen in order to determine the best temperature for different surfaces. In general, soft woods can be burned at a lower temperature of approximately 450 degrees Fahrenheit. This is applicable to soft woods such as poplar and linden. Plywood also requires lower temperatures.
Harder woods such as ash and oak require temperatures well above that of soft woods. You will need to practice on different woods to see what temperature works best. You should begin with a low pressure and high speed, gliding quickly over the material. This will aid in preventing unsightly burn holes from appearing in the wood.
How Do I Use a Pyrography Stencil?
While many people draw their designs directly onto the material freely by hand, others may prefer to use a template or stencil so as to guarantee a perfect design. Templates are especially useful for fonts and lettering.
To work with a stencil, simply place it directly onto the surface of the workpiece and use a pencil to trace the lines. Once the design has been transferred to the surface in pencil, you can begin going over the contours with your wood burning pen, after which you can start shading and adding more detail.
You can also use carbon or tracing paper to transfer a paper template to your surface. You can find a variety of templates online that can be printed onto paper. You will need to place the carbon paper directly onto the surface, and then the paper with the printed template on the very top. You can then begin tracing the design with a pencil so as to transfer the pattern from the carbon paper onto the wood, cork, or leather surface.
How is a Wood Burner Tool Used?
The wood burner tool is much like a soldering iron, where a metal tip is heated by the electrical current passing through it. The heated tip is then used to burn letters and images onto wood or other materials. The marks left behind by the burning are that which creates the design.
What is the Difference Between Wood Burning Art and Pyrography?
The word “pyrography” can be translated to mean “writing with fire”. While many people do use the terms “pyrography” and “wood burning” interchangeably, there is in fact a slight difference. Wood burning is pyrography that is done specifically on wood, whereas pyrography itself can be performed on a number of materials, such as wood, leather, cork, and cardboard.
What Wood Should I Use for My Pyrography Project?
It is easier to burn soft woods with a low grain than hard woods. Soft woods also burn more easily, so you should begin on a lower heat when burning your design.
Who Can Do Pyrography?
Everybody and anybody can enjoy this amazing art form. However, children should only do this with adult supervision, and any child younger than 12 should not attempt this type of hobby.

I have been into woodworking since 2005 and woodturning since 2011. Because of my love for wood and woodworking, I started woodhappen.com to teach other enthusiasts about how to finish and seal wood, the best woodworking tools, the different types of wood, and everything else related to woodworking! Read more about me here.