Wood Epoxy – Your complete Guide for Epoxy Resin and Wood
Epoxy resin is such a versatile product that it can be used for a variety of projects. One of the favorite uses of epoxy, is to merge it with wood. You can easily use epoxy resin to seal the wood and make durable repairs to your wood. You can also create amazing design tabletops by molding the resin into the wood. Epoxy resin can also be used on countertops and floors. Even create beautiful resin 3d flooring designs. Following are some ideas on the most popular applications and we will be showing you how to put it into effect.
Epoxy Resin Overview
The general definition of epoxy resin is that it consists of thermosetting polymers. Two components, a hardener, and the resin, when combined form a solid surface. To get the best finish, the two components must be mixed in the perfect ratio. This will then produce a chemical reaction and the final result is a durable surface that is resistant to chemicals, solvents, water, and surface abrasions.
For the best final results, the process relies on the following:
- Making sure the surface you are going to coat, is thoroughly cleaned and prepared.
- Correct mixing time and ratio, following the manufacturer’s instructions is crucial.
- An ideal working environment.
The process begins when the resin and hardener are thoroughly mixed, an exothermic reaction will begin to happen. The liquid then changes becoming gel-like and eventually it cures to a solid and tough surface.
The curing process will take some time, depending on what you are doing. Other factors that affect the curing time include:
- The environment and temperature.
- What type of hardener you use.
- The amount of heat given off.
- The type and temperature of the base surface you are covering. Surfaces could be wood, metal, laminate, concrete etc.
The one factor you should consider the most is heat. The warmer the epoxy resin is, the quicker it will cure. When the epoxy resin reaction gets too hot, it could cause problems even melting materials nearby. The epoxy resin might also not cure correctly.
Best Epoxy for Wood
Wood is something that reacts to humidity, causing it to either swell with increase moisture or shrink slightly in dry conditions. This is one issue that makes it difficult when bringing the wood and resin together. You must be aware what kind of application to use.
Some factors to consider for your wood and resin projects:
- Is your item going to be exposed to the sun and elements?
- A thick resin should be used for casting molds, as well as for filling cracks and holes in the wood.
- Use a thinner resin for coating your wood surfaces.
Epoxy Resin and UV Protection
The crystal-clear epoxy resin is a popular and common choice, but it does yellow over time. So, if you want to use epoxy resin in outdoor applications, you will need to get a UV resistant resin. You can also purchase other additives that will improve resistance to light.
Epoxy Resin and Shrinkage
Epoxy resin shrinks less when compared to polyester resin but can still cause problems. If the resin shrinks, you might find areas that you thought covered, are only partly covered. This means you will have to apply another layer, and this costs more money and time. To get round this, buy a resin that has the lowest shrinkage rate. The product should, of course, also be of excellent quality for the most reliable results.
Epoxy Resin Layer Thickness for each Casting
You should consider the maximum epoxy resin layer, especially for molds and tables. Learn which products can be cast at what thickness and also what quantity you can use. Your average commercial resin can be used to cast a maximum layer of 2 cm and the quantity you can use is about 10 kg. When you go over this amount, the reaction will produce huge amounts of heat and this can cause the resin to harden straight away. The resin will leave behind ugly spots and will not be what you were aiming for.
Resin Epoxy Firmness and Resistance to Heat
The hardness of resin can vary, from soft to hard. The soft resin can be marred by scratches, while the hard resin is scratch-proof and can take higher temperatures. You should consider buying a superior quality resin for those items you intend to use a lot. Items like tabletops or cutting boards, for this you need a more resistant resin. Remember, always follow the manufacturer’s instructions and mixing ratio for best results.
Epoxy Resin for Wood Product Recommendations
Best Epoxy for Casting Wood: Incredible Solutions Pourable Plastic
This extremely viscous casting resin comes in a 2-part three quarter gallon kit. You can pour it to a thickness up to 2 inches and is the best resin for castings, river tables, live edges amongst other applications. The resin cures glossy and clear with a professional look. you can also tint it with mica powder for effect.

- Deep pour of 2 inches thick
- Low exotherm and low viscosity
- Long working time and minimal shrinkage
The resin contains UV blockers, so you can place it in the sun but do not leave your item outside. When applying a deep pour, remember it takes time to fully cure. This product can take anything from 32 hours to 72 hours for it to begin to harden, but it can take up to seven days to fully cure. The time is dependent on the temperature. If you need to add a second layer, wait until it is just beginning to harden and a little sticky. Wait until fully hardened before using your item.
Pros
- You can do deep pours up to 2 inches
- The finish is glossy and clear
- The viscosity is low and covers corners and cracks easily.
- Easy to work with
- The working time is long
Cons
- There are no recorded disadvantages
For Sealing: PRO MARINE Crystal Clear Tabletop Coating
This product offers great performance and produces a beautiful clear coating that is easy to apply. Once the resin has hardened, it is durable and resistant to scratches and liquids. Great for bar tops and river tables. This product can be applied to numerous surfaces, and this includes wood.

- High-quality crystal clear Table Top Epoxy
- Food Safe formula with no VOC and solvent additives
- Water and scratch-resistant coating, high-gloss
The resin includes 100% solids and, therefore, offers the best color and has the best air release properties. You can easily use it for a deep pour, which will help to get rid of any problems like crawling, fisheyes, or craters.
The product is approved by the FDA and can, therefore, be used on surfaces where food will be. So, great for river tabletops, bar tops, glass items, tumblers, a variety of craft projects and repair jobs at home.
Pros
- Is non-toxic and has no VOC’s.
- Easy to apply.
- Can be applied to numerous surfaces.
- FDA approved
- Cures beautifully clear
- Produces a glossy surface that is resistant to scratches.
Cons
- Takes time to fully cure, about 72 hours.
- You only have a working time of about 35 minutes.
Let’s have a Look at a few Application Ideas
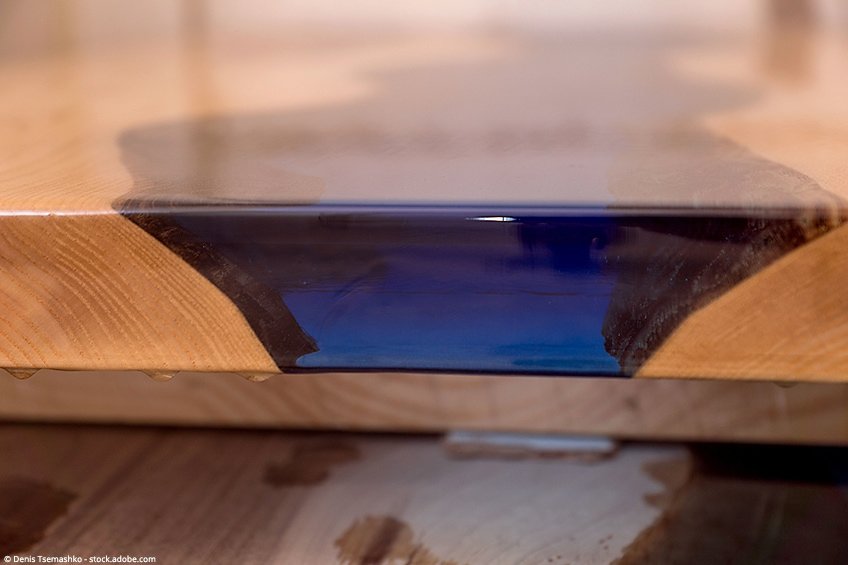
Epoxy Resin and Sealing Wood Surfaces
Epoxy resin is the perfect choice when it comes to a product for sealing the wood. After application, the wood becomes water-resistant and is protected from damage like abrasions. You can use epoxy resin for sealing in the following cases:
- As a floor coating
- Kitchen countertops
- On furniture
- Used on cutting boards
- Tabletops
Epoxy Resin Guide to Sealing Wood
When working with epoxy resin, your workspace is vital for the best epoxy coating results. The environment should be dry and with no dust and the temperature of your environment, the wood and epoxy should be alike. This is so you can produce excellent results without any problems. The best epoxy resin for sealing wood is known as laminating resins. These come in medium to high viscosity and cure to a hard and durable surface.
Preparing the Wood Surface
- To attain excellent adhesion to the wood, you need to consider a few things. First, the surface should be thoroughly cleaned and allowed to dry completely. Make sure to get rid of any oily or greasy marks, as this can affect the application of resin. The surface should also be a bit rough for better adhesion, so some sanding might be necessary.
- To thoroughly dry your surface, you can use a heat gun. You can then start sanding the surface, either with an electric sander or you can do it by hand. If you find your wood to be oily, you can simply apply some acetone.
- Once sanding is done, remove any dust by vacuuming and brushing the surface. Take a soft cloth (lint-free) with a bit of solvent and rub the surface clean. Once done do not touch the surface with your hands, as your hands may be dirty which could ultimately affect the quality of adhesion.
- Add a barrier along the edge, this is to prevent any resin from running over. You can use a good quality tape, which should be able to resist the resin liquid. The surface you are coating should also be level, you want a nice even layer of resin.
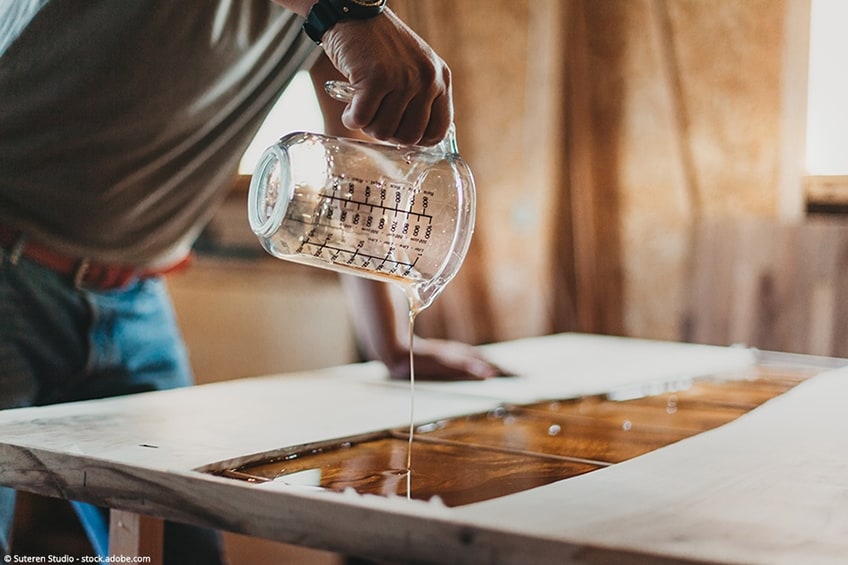
- It is best to work out the amount of epoxy you will need before you begin. You can easily calculate this by using a resin calculator. This is significant, as you only have a certain time to working with the resin.
- Always mix thoroughly but carefully to avoid excessive bubbles. You can now include color into the epoxy mixture. There are many choices for color, each material providing their own properties. So, do your research before choosing for best results, you can read up on this in articles about color and Epoxy Resin.
- Begin pouring in the center of your surface and move in a circular or zigzag motion, this helps to distribute the resin uniformly. The mixture needs to blend evenly, so you might have to pour again. Once done, a few minutes later you can level it further.
- Once the mixture begins to level, bubbles may appear. These bubbles should be removed by using a handheld torch burner. Keep moving the torch around, this prevents one spot from becoming too hot. The bubbles rise to the surface and pop when heat is applied.
- Subject to the type of product, the mixture will stay a liquid for a while. You can work with it and get the thickness you want before it starts to harden. Once the mixture begins to harden, it first appears gel-like, at this stage, you should stop working on it.
- You might be able to apply a second layer of epoxy resin without sanding if the first layer has not fully cured. This can be attempted about 48 hours after the first coat since the epoxy resin has not hardened completely, the second layer can easily bond with it.
Epoxy resin works and spreads better when warm, you can place the resin into some warm water before you cast. The room you work in can also be warm, as colder temperatures affect the flow of the epoxy resin.
Epoxy Resin and Stained Wood
You can use Epoxy resin on stained wood. To ensure everything works according to plan, you can do a small test beforehand. Most color stains are fine to work with, but to avoid damaging your wood piece rather do a small test first. As always, everything must be completely dry before you start.
An advantage would be to have a stain that is UV-resistant because when the layer of epoxy is done, you will not be able to change anything. If you do consider removing the epoxy, you might want to think again, as it is a big job and will take you quite a while to do.
In general, solvent-based wood stains might not be a good idea, but water-based stains should be okay as long it is completely dry before applying the epoxy.
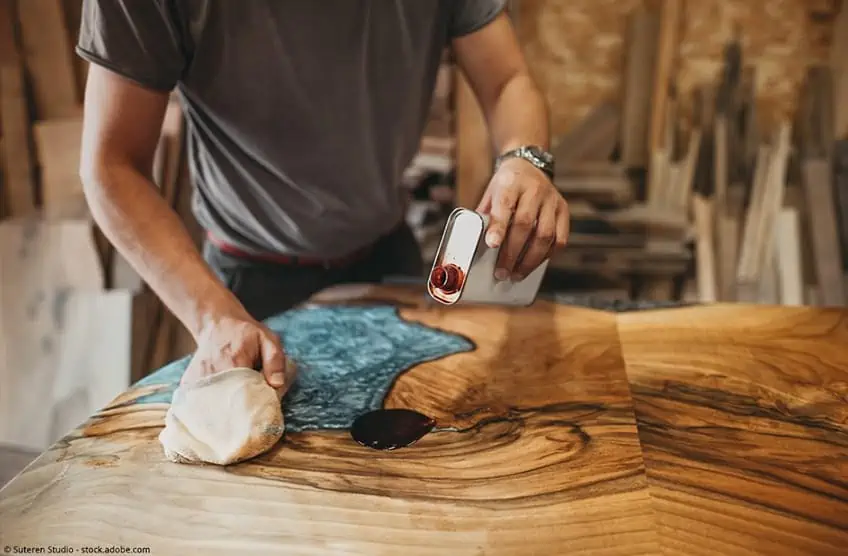
Filling Wood with Epoxy Resin
When working with wood you get many different kinds, some with knots or cracks which provides a certain uniqueness. At times when the surface you are working on needs to be flat, for example, a table, and you want to keep these blemishes, you can use epoxy resin to fill up the cracks. How is this done?
- First, clean up any dust or pieces of loose wood.
- Again, preparation is important as there will be little time change things once you have started to pour. Take some good quality tape and place around each crack or hole, this will stop the resin from going everywhere. Remember, to also tape the back of the wood. Sometimes a hole goes straight through.
- Mix your resin and hardener thoroughly. In many cases, a color resin works best, such as a dark pigment for wood tabletops. Try to mix a color that provides a consistent effect.
- Fill the cracks or holes to the surface, leave a few minutes, then come back to see if any of the resin has sunk down. You do not want to have to make up an extra resin mixture later. Some epoxy resin can shrink, so the less it does this, the less it will sink while curing.
- Keep an eye on your time. For example, if the time for curing is about 30 minutes, then you only have about 20 minutes to work with the mixture. In this case, you should be making smaller quantities of epoxy resin instead of one large amount.
- When filling a hole with epoxy resin, it is best to add a little too much. The resin that overflows will be stopped by the tape you placed. Also, the hardened resin can be sanded off. Filling cracks and holes with epoxy resin should be a fairly easy job for anybody.
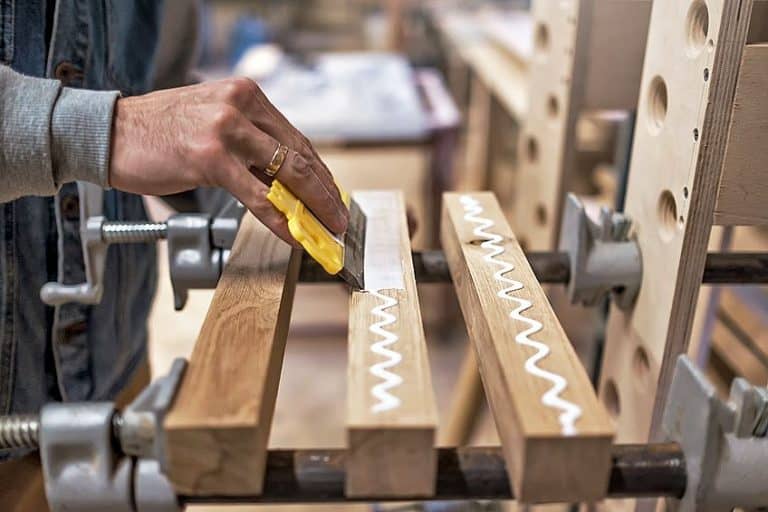
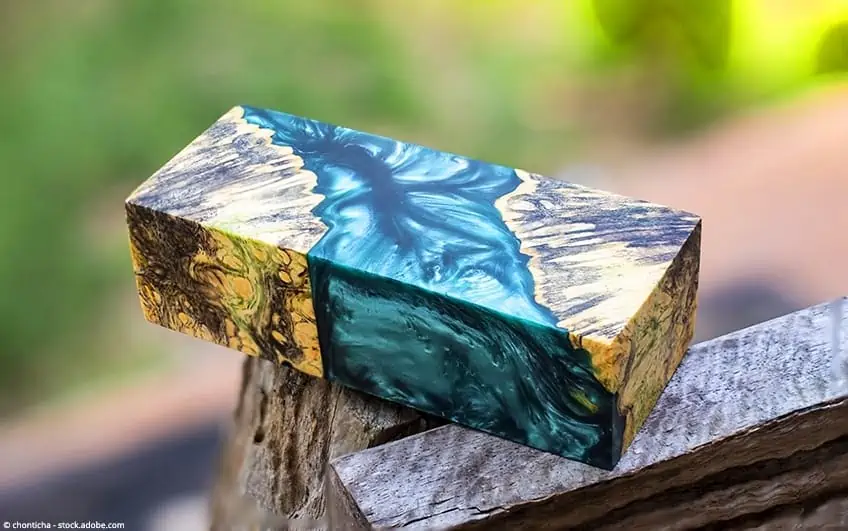
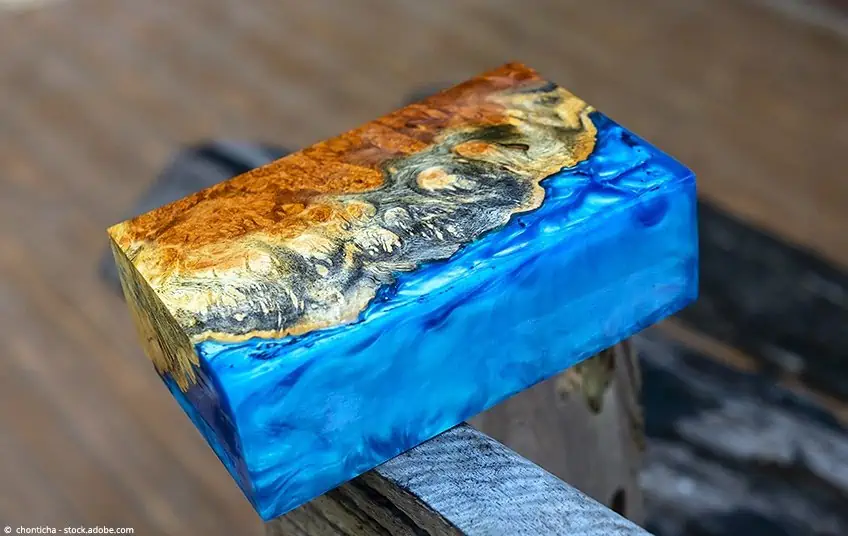
Casting with Wood
Make amazing art or functional items by casting wood in epoxy. You can make jewelry, pieces of art, pens, and lots more. To cast molds, you require:
- A mold created by yourself.
- Angular Casting Mold, which is constructed of synthetic plates coated in resin. These are screwed together and then silicone is used to seal it. This type of casting mold does require experience.
- Silicone Molds, which are easily available and come in a variety of shapes and sizes. This is the easiest method, you simply put the wood inside your mold and pour your epoxy resin over.
Remember to find out the thickness you can layer your resin. You might have to add several more layers to the mold. Adding the next layer to the previous layer which has not fully cured or hardened.
Sanding once fully cured
In many cases when working with wood, you will need to sand any excess epoxy off. The more accurate your work, the less you will have to do. When is the perfect time to sand? Between 48 and 72 hours is the best time, but this also depends on what product you used. If the epoxy resin completely cures, it will not be easy to sand, as the surface will be quite hard.
However, it is possible to still do it, the process is as follows:
- Begin sanding using a rough 80-grit paper and work your way to the fine 2000-grit sandpaper. Make sure to remove the scratches made by the rough sandpaper.
- Sandpaper by hand smaller items and for bigger projects, make use of an electric sander.
- When busy, use the wet sanding technique, as it is more effective and creates less dust.
Always wear a protective respiratory mask when sanding, as you do not want to breathe in the dust.
Completing your Work: Oiling and Painting
The fully cured surface is great without any further steps. But you can improve the appearance by creating more of a gloss. Sanding and polishing the surface will make it perfect. The exposed wood also needs to be treated to protect it from liquids.
- Small items can easily be polished with a cloth and polish paste. Polish in a circular fashion and you will have a shiny surface in no time.
- You can also add wood polish to any exposed wood pieces.
- Larger areas can be polished using an electric polisher. The polishing will be done quickly, and the gloss is much better than done by hand.
To get a professional finish, you can also use a good quality polyurethane paint. Otherwise, some hard wood wax will do the job on the resin and wood. Carnauba wax is an excellent choice, as it works perfectly on both the wood and resin. Apply with an electric polisher, as it is an extremely hard natural wax.
Allow everything to dry completely, after a couple of days, you can add more coats until you notice the oil is not absorbing anymore. You can finish off by polishing again, this should really make it shine.
Using Epoxy Resin to Repair Wood
First, discover what the problem is. If this is not possible, you might have to get a professional in. To apply the best solution, you need to ascertain exactly what the problem is. For example, you notice wood that is rotting due to excess moisture. You will then have to replace the damaged wood with something more durable, such as teak or white oak. Also, you might want to place a metal sheet between the old and new wood.
Another issue is when the paint degrades and exposes the wood to moisture and then rots. Here, you can simply apply another fresh coat of good quality paint. In these two instances, new materials were incorporated to solve the problem. Nonetheless, more difficult issues could pop up. Epoxy resin can then save the day.
First, always dry the wood properly. This might take some time but is an essential step as you do not want any lingering moisture to spoil anything further. Also, the wood surface will not adhere to the epoxy very well if not properly dry.
Next, we have a look at how you go about using epoxy resin to repair wood.
Remove or try to Save the Damaged Wood
You can test the damage to the wood by simply using a screwdriver, jab at a few pieces and see what the wood does. Next, you can either stabilize the wood with an epoxy consolidant or remove any damaged areas.
If you want to get rid of some wood, you can use a screwdriver, paint scraper, or chisel. After you have seen how much damage there is, you can then remove the paint as well as the rotten wood. Old paint may contain lead, so it would be advisable to learn how to remove this safely.
Can the wood section be saved? If so, dry it out completely and drill two ¼-inch holes an inch apart from each other. Apply your epoxy consolidant, which should be absorbed by the wood. Find yourself working on a vertical incline? For this drilling deeper holes might work better. This to ensure the consolidant spreads out more efficiently.
Try not to drill through the wood, but if you do, simply use some putty to fill the hole and stop the consolidant from leaking out. See below on how to use epoxy consolidant.

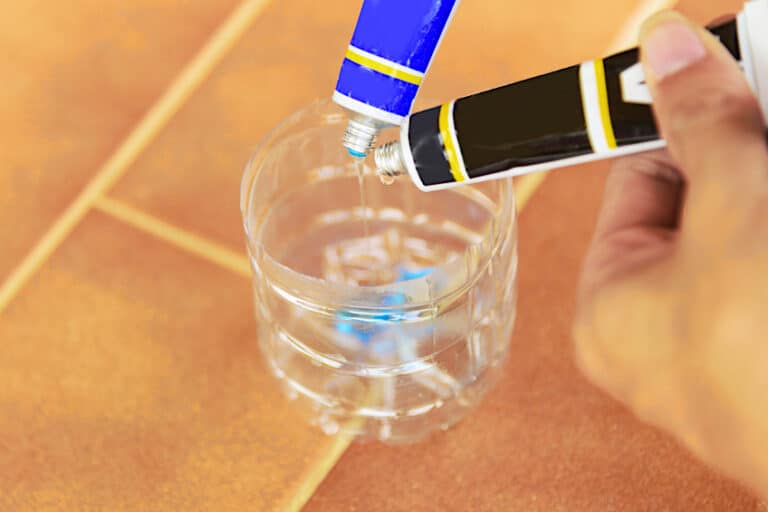
Applying Liquid Epoxy Consolidant
Make sure to work in an environment that is well-ventilated and since there are some fumes, it is a good idea to wear a mask respirator. The amount of consolidant you use is important, for epoxy resin as it has to be precise. So, read the manufacturer’s instructions carefully to get it right.
You have the product ready and you have drilled the holes into the wood, next apply the consolidant into the holes. You can also use a brush to make sure everything is covered, keep doing this until the wood is saturated.
Allow the wood to dry for about a week and to protect the area from dust and rain, cover with a plastic sheet. The sheet can go outside on sunny days, which might help with the drying process as well.
External Epoxy Filler
You can begin this step, even if the consolidant has not fully hardened.
Follow these steps:
- Using a stick, take the epoxy filler or putty, about the size of a golf ball of part A and part B.
- Using a mixing board, mix the two parts thoroughly.
- Label the lids A and B so that you won’t confuse what goes where, which could land up gluing the wrong lid to a container.
- Make sure to have separate sticks for everything.
- Make sure your mixing items and board are cleaned properly. If any hardened epoxy remains, it can mix with the new and will lessen your work time.
- Next, take note of the temperature, this determines the hardening point of the filer. You will have 30 minutes to work with the resin if the temperature is 69.8 °F(21°C). The epoxy will begin to harden much quicker in warmer conditions.
- If you are doing a job outside, it is, therefore, suggested it is done in the shade to keep things cooler. Once done, whatever you are working on can be placed back in the sun to hasten the curing time.
Applying the Epoxy Filler
Stuff the epoxy filler into the wood using your putty knife. Apply with pressure to make sure the wood and the epoxy bonds properly. When it comes to deep areas and you want to make sure the filler is getting everywhere, you can use an additional piece of wood.
Place these carved blocks of wood after you have applied the filler into the hole. To get optimal results, you can then apply more filler over everything. When using additional wood, make certain the wood is similar to the wood you are repairing, and the grains should also align correctly.
Shaping the Filler
You can shape the filler to what you need using your hands, just make sure to wear some gloves. If you notice the filler is in excess, that is okay, it is better and easier to shape once done. You do not have to be precise with the shape as long as it sticks to all the adjacent materials. Allow to dry, leave as long as it takes taking note of the weather.
Transform the Shape
Test out the epoxy to see how hard it is, as long as it does not dent, you can begin sanding. Begin shaping by using a rasp or Surform plane. Travel along the natural contours of the adjacent wood. Once this initial shaping is done, you can use some sandpaper for a more detailed look.
When sanding, you can fold your sandpaper around something that is cylinder-shaped, to get a better outcome. You also do not want to sand any other areas that do not need it, which is why this step needs accuracy and persistence. Rushing the job will only leave you dissatisfied with the results.
If you notice that too much epoxy has been removed, you can easily add another layer. Clean the area thoroughly and have your filler ready and mixed correctly. For a thin layer, you can try adding consolidant to the area first and then filler to reach the correct thickness. Use a dryer to heat the added layer, after which you can sand again. Finish this step by painting over another normal layer, this should then last an exceptionally long time.
When using sandpaper, start with an 80-grit paper and then go for a 120-grit paper for more refined work. Wear shielding glasses and a facemask to safeguard your health. Use an electric dust buster and a bit of acetone to tidy up.
Painting your Surface for added Protection
Begin by applying primer to the area, then follow with two coats of acrylic paint to protect the underlying wood and epoxy. To the final layer, you can add polyurethane sealer. Every year you should check your repairs to see if anything needs to be redone.
Epoxy resin for wood is a good way to make repairs to your wood item. Simply follow instructions and make sure you know about any precautions before you begin. Prepare and read about the process so you have no problems when applying.
Wrapping Up
As we begin to end our article, we hope you have gained a new understanding of what is possible with epoxy for wood. This should enable you to begin your wood and resin projects. Here is wishing all your projects turn out perfect every time.
Questions and Answers
Is Epoxy for Wood Water-Resistant?
Wood epoxy is perfect for those wood items that are subjected to certain stressors and moisture. The wood epoxy will waterproof the wood it covers.
Is Wood Epoxy Resin as strong as Wood itself?
When it comes to a wood item, the aim is to create a stronger joint, which the epoxy accomplishes. Unlike other materials such as metal, where there is little change in effect. Also, you can use a variety of glues, which provide sufficient waterproof properties to wood joints.
Should you Seal Wood before Adding your Wood Epoxy?
Yes, this is an important step. Simply coat the wood with a thin layer of wood epoxy resin and allow to cure. This will provide an adequate seal before you add more epoxy resin for wood.

I have been into woodworking since 2005 and woodturning since 2011. Because of my love for wood and woodworking, I started woodhappen.com to teach other enthusiasts about how to finish and seal wood, the best woodworking tools, the different types of wood, and everything else related to woodworking! Read more about me here.